

How to carry your kit on a mountain bike and still enjoy the trail, from the Pokhara team that has set up and repaired bikes for Himalayan trails since 2004.
Bikepacking on a mountain bike means carrying what you need for a night or more in soft bags on the bike. You then ride trails that a bike with racks and panniers couldn't follow. You don't need a special bike. The mountain bike you already own will do it, if you choose the right bags, put the weight in the right places, and change a few settings.
We're Nepal MTB Adventures. We guide, rent, and repair mountain bikes in Pokhara, and many riders hire a bike from us and ride Nepal on their own. This guide starts with what applies anywhere: the bike, the bags, the packing, and the setup. Then it covers bikepacking in Nepal, where you sleep in a lodge every night and can leave the tent at home.
Mountain bike bikepacking in brief
What it is: riding for more than a day with your kit in soft bags on the bike
The bike: any sound mountain bike. A hardtail carries the most. A full-suspension bike carries less and rides rough trails better.
The bags: a frame bag, a handlebar roll, a seat pack and a top tube bag. A full set holds about 30 litres.
The packing rule: heavy things low and in the middle, light things at the ends
The setup: more air in the suspension, a little more in the tyres, easier gears and fresh brake pads
Your first trip: one night, close to home
In Nepal: lodge to lodge with no tent or stove, from about 800 m (2,600 ft) to 5,416 m (17,769 ft)
What is bikepacking on a mountain bike
It's a multi-day ride where your kit travels in soft bags strapped to the bike, so the bike stays narrow and light enough to ride real trails.
You'll see it written as bikepacking or as two words, bike packing. Riders also call it MTB bikepacking. They all mean the same thing.
The idea is simple. Racks and panniers carry a lot, but they are heavy, and they hang wide of the bike. On rough ground, they rattle, catch on rocks, and can bounce off. Soft bags sit inside the frame, on the handlebar, and behind the saddle. They carry less, and that is the point: you pack less, and the bike still handles like a mountain bike.
Bikepacking bags | Racks and panniers | |
Where the load sits | Inside the frame, on the bar, behind the saddle | On racks beside the wheels |
Weight of the luggage itself | About 1 kg (2.2 lb) for a full set | About 2.5 to 3 kg (5.5 to 6.6 lb) for a rack and two panniers |
Space | About 30 litres | 40 litres or more |
Best on | Singletrack, jeep track and rough dirt roads | Tarmac and smooth gravel |
On rough ground | Stays tight to the bike | Can rattle, catch and bounce |
Why a mountain bike suits it
A mountain bike already has what a loaded off-road ride needs: wide tyres for grip, suspension to take the hits, low gears for climbing and strong disc brakes for the way down. That is why so many bikepacking trips start on the bike already in the garage.
Two ways to do it
Camping. You carry a shelter, a sleeping bag and mat, and a stove. You can stop anywhere it's allowed.
Lodge to lodge. You sleep in a lodge or guesthouse each night and eat there. You carry clothes, tools, water and snacks, and very little else.
The second way needs about half the kit. It's how bikepacking works in Nepal, and Part 8 explains it.
The best mountain bike for bikepacking
The best bikepacking bike is usually the mountain bike you already own, as long as it's in good order. If you're choosing, a hardtail is the easiest to load. Take a full-suspension bike when the trail is rough, and your load is light.
Hardtail | Full suspension | Rigid mountain bike | |
Room for bags | The most: a full frame triangle and space behind the saddle | The least: the shock takes frame space and the rear wheel moves up towards the seat pack | Plenty, often with extra mounts |
Weight | About 2 to 3 kg (4.4 to 6.6 lb) lighter than a similar full-suspension bike | Heavier | Lightest |
On rough descents | Fine, but your body takes the hits | The most control and the least tiring | Hard work |
Parts that can fail far from a workshop | Few | More: a shock, pivots and bearings | Fewest |
Best for | Mixed routes: dirt roads, jeep track and moderate singletrack | Technical trails with a light load | Smooth dirt and gravel |
Hardtail bikepacking
A hardtail has a suspension fork and a rigid rear end. Nothing moves behind the saddle, so a seat pack sits safely clear of the tyre. The frame triangle is open, so a large frame bag fits. It's lighter to push and carry, and there is less on it to service. For most first trips, this is the bike.
Full-suspension bikepacking
You can bikepack on a full-suspension bike, and on rough trails it is the nicer ride. You have to solve two things:
The frame triangle is small. The shock sits where a frame bag would go. Use a small half-frame bag or one made to fit your frame.
The rear wheel moves. When the suspension compresses, the tyre rises towards the saddle. A big seat pack can hit it. Use a small, dropper-friendly seat pack or a small rack that mounts to the rear axle or seatstays.
A full-suspension bike works best when the load is small. That's one reason it suits lodge-to-lodge trips so well.
What matters more than the type of bike
Check your bike against this list before you buy a single bag:
Tyres at least 2.0 inches wide, set up tubeless. Go to 2.3 inches or wider for rough or loose ground.
A low gear you can climb in for an hour with a load on the bike (see Part 5)
Hydraulic disc brakes with plenty of pad left
A recent service, including the fork and any pivots
A fit you know. Day three is not the time to find out a saddle doesn't suit you.
> Guide's tip: choose the bike for the roughest descent on your route, then make the luggage fit that bike. Riders who choose the bike for the bags usually regret it on the way down.
Bikepacking bags for a mountain bike
Four bags do the job: a frame bag, a handlebar roll, a seat pack and a top tube bag. If you only buy two, start with the frame bag and the handlebar roll.
Bag | Typical size | What goes in it | What to watch on a mountain bike |
Frame bag | 3 to 9 litres | Heavy things: tools, spares, food, a water bladder, a power bank | On full-suspension and small frames, only a half bag fits. Don't overfill it; the zip is the weak point. |
Handlebar roll | About 10 litres | Light, bulky things: sleeping bag, down jacket | It must clear the front tyre when the fork is fully compressed, and it mustn't pull on cables or hoses. |
Seat pack | 5 to 14 litres. Dropper-friendly packs are usually under 10. | Clothes | It needs clear space above the rear tyre. Pack it tight, or it sways. |
Top tube bag | About 1 litre | Snacks, phone, sun cream | Keep it slim so your knees don't hit it. |
Fork bags | A few litres each side | Water or light, bulky kit | Only with mounts made for a suspension fork. Keep each side under the maker's limit, often about 3 kg (6.6 lb). |
Small backpack or hip pack | As small as you can manage | Water, a layer, valuables | Keep it light. A heavy pack tires your back and shoulders on long days. |
Dropper posts and seat packs
A dropper post is worth keeping on a mountain bike, and it's the part that most often clashes with luggage.
A standard seat pack straps around the post. That stops the dropper from moving and can scratch it.
A dropper-friendly pack hangs from the saddle rails or uses a small clamp that protects the post.
As a rule, you need about 13 cm (5 inches) between the saddle rails and the top of the rear tyre with the post down.
Test it properly. Fit the pack, drop the post, then push the rear suspension through its travel. On a full-suspension bike, let the air out of the shock to do this. If the pack touches the tyre in the workshop, it will hit it on the trail.
Should you wear a backpack?
Put the weight on the bike first. A small pack is useful for water and for the things you can't afford to lose: passport, money and phone. On a full-suspension bike with no room for a seat pack, a light backpack can take your clothes instead.
Racks and panniers on a mountain bike
Classic panniers are a poor fit for rough trails. A small, modern rack that mounts to the rear axle is different: it carries a dry bag on top, keeps weight off the dropper post, and still lets the suspension move. It's a good answer for full-suspension bikes and for shorter riders with little space behind the saddle.
> Guide's tip: once the bags are on, turn the bar fully left and right and compress the fork as far as it will go. If a bag touches the tyre or tugs a cable now, fix it now.
How to pack for bikepacking
Put heavy, dense things in the frame bag. Put light, bulky things on the handlebar and behind the saddle. Keep what you need while riding on top.
Where | Weight to put there | Examples |
Frame bag (low, in the middle) | Heaviest | Tools, spares, pump, food, water, power bank |
Seat pack | Medium to light | Clothes, with the heaviest items nearest the seatpost |
Handlebar roll | Lightest | Sleeping bag, down jacket |
Top tube bag | Small things | Snacks, phone, lip balm |
On your back | As little as possible | Water, valuables, one layer |
A heavy handlebar makes the steering slow and pushes the fork down. A heavy seat pack swings from side to side. Weight in the middle of the bike does neither, so that's where the dense kit goes.
Pack in this order
Lay everything out on the floor.
Take a third away. Almost everyone packs too much the first time.
Fill the frame bag with the heavy items.
Roll the sleeping bag and warm jacket into a dry bag for the handlebar.
Pack the seat pack tight, heaviest items first, and squeeze the air out before you close it.
Put snacks and your phone in the top tube bag.
Weigh the loaded bags.
Ride it.
How much to carry
Kind of trip | A good target for your kit |
Lodge to lodge | About 5 to 8 kg (11 to 18 lb) |
Camping | About 8 to 12 kg (18 to 26 lb), before food and water |
These are targets, not limits. Every kilogram you leave behind makes the climbs easier, the descents safer and the bike kinder to its own parts.
Your bikepacking setup: suspension, tyres, gears and brakes
A loaded mountain bike needs more air in the suspension, slightly firmer tyres, an easier lowest gear and brakes in top condition. Make the changes with the bags on.
Part of the bike | What to change | Why |
Suspension | Load the bike fully, then set the sag again. Add air to the fork and shock within the manufacturer's limits. | Your sag was set for you alone. Extra weight uses up travel before you hit anything. |
Tyres | Start 2 to 3 psi higher at the rear and 1 to 2 psi higher at the front, then adjust. | More weight means more rim strikes and more tyre squirm at your usual pressure. |
Tubeless sealant | Replace it if it's more than about three months old. | Old sealant has dried out and won't seal a hole. |
Gears | Most mountain bikes come with a 32-tooth chainring. Fit a 30 or a 28. | You climb slower with a load, so you need an easier gear to keep pedalling. |
Brakes | Fit fresh pads and carry a spare set. | A heavier bike takes more stopping, and long descents wear pads fast. |
Frame | Put clear protective tape wherever a bag or strap touches. | Dusty straps rub through paint in days. |
Water | Add a bottle cage under the down tube or on the fork, or carry a bladder in the frame bag. | A frame bag usually takes the space where your bottle was. |
Bolts | Check every bolt, then check the bag straps after the first hour. | Loads work things loose. |
A quick gear test
Find your longest local climb. Ride it loaded, in your easiest gear. If you couldn't hold that for an hour, fit a smaller chainring before the trip. It's a cheap change, and it makes more difference than any bag.
> Guide's tip: set your suspension with everything on the bike, including full water. Two litres of water weighs two kilograms, and it's usually the last thing riders add.
Bikepacking packing list
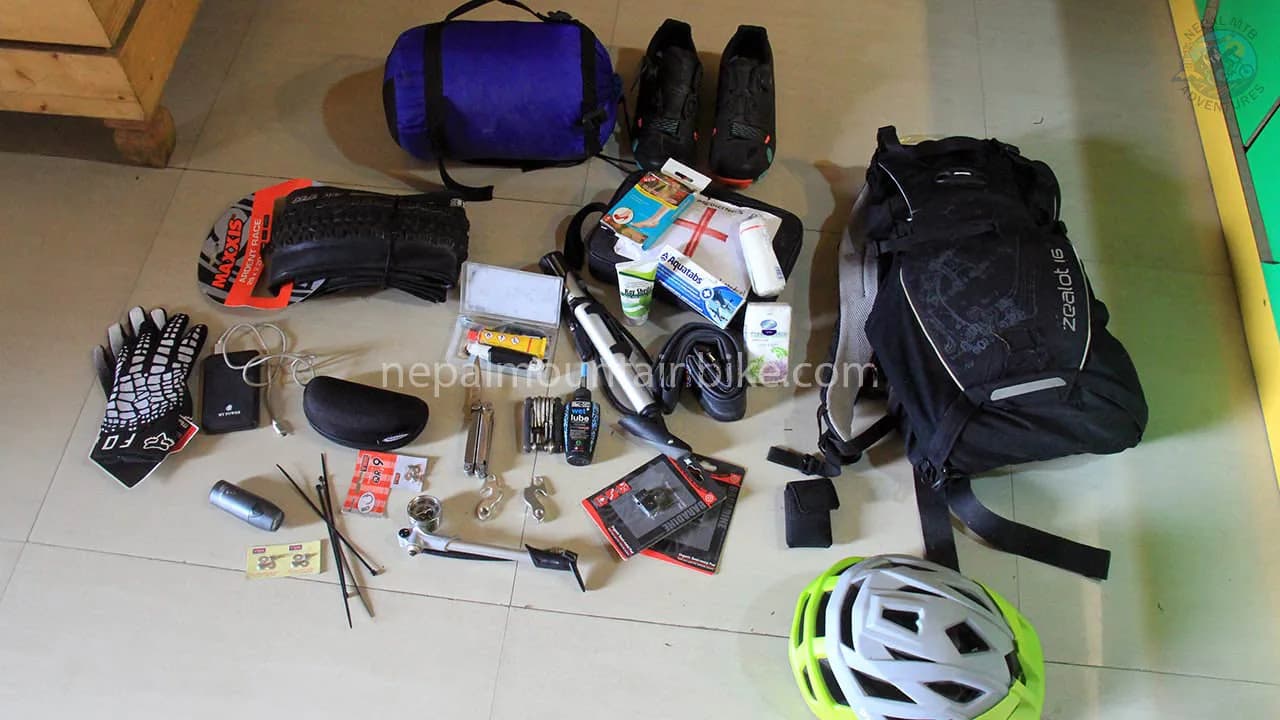
Every trip needs riding kit, tools and spares. A camping trip adds a shelter, a sleep system and a kitchen. A lodge trip doesn't.
On every trip
Helmet, gloves and glasses
Padded shorts and two riding tops
Waterproof, windproof jacket
One warm layer
Off-bike clothes and light shoes or sandals
Water: bottles or a bladder, plus a way to treat it
Snacks for the day
Phone with offline maps, power bank and cable
Headlamp
Small first aid kit, sun cream and lip balm
Tools and spares
Multi-tool with a chain breaker
Pump, tyre levers, tubeless plugs
Two spare tubes, even if you run tubeless
Small bottle of sealant
Two chain quick links
Spare brake pads
Spare derailleur hanger for your exact frame
Chain lube and a rag
Spare straps and a few cable ties
Shock pump, if your bike has air suspension
Add these if you're camping
Tent, tarp or bivvy bag
Sleeping bag and mat
Stove, fuel, pot, spoon and lighter
Food for the days between shops
Add these for a lodge trip in the mountains
Warm sleeping bag for the high nights
Down jacket, warm hat and warm gloves
Buff or face covering for dust
Cash for the whole route
Printed permits and your passport
Water filter and purification tablets
For the full list by season, see our mountain biking checklist for Nepal.
Your first overnight trip
Make it one night, close to home, on trails you know. The aim is to test your packing, not your legs.
Pick a short loop you could ride in a day, and split it in two.
Choose an easy place to sleep, such as a campsite, a hut or a guesthouse.
Keep the food simple. Carry dinner, or eat where you stay.
Have a way out. Choose a route you can cut short if something breaks.
Ride it loaded, and pay attention to how the bike feels.
Make notes when you get home.
What to check on that first ride
Does any bag touch a tyre on rough ground or under hard braking?
Does the seat pack sway when you stand up to pedal?
Can you still use your dropper post?
Does the steering feel slow? If so, move weight from the bar to the frame.
Did you run out of gears on the climbs?
What did you carry and never use? Leave it at home next time.
Bikepacking in Nepal: how it works
In Nepal, you bikepack from lodge to lodge. Family-run lodges, called teahouses, line the main mountain routes and give you a bed and hot meals. You don't need a tent, a mat or a stove.
That changes the whole load. Without camping kit, your bags are small. A small load is easy to fit on a full-suspension bike, which is the better bike for Nepal's rough descents. So here you get both: a light bike and a capable one.
Leave at home | Still carry |
Tent | Warm sleeping bag for the high lodges |
Sleeping mat | Down jacket, hat and gloves |
Stove, fuel and pots | Tools and spares for the whole route |
Several days of food | Snacks, and 2 to 3 litres of water capacity |
Cash, permits and passport |
A day on the trail
You start early, because mornings are clear and calm. You ride old footpaths, village trails, jeep tracks and singletrack, and you'll walk some sections with the bike. Lunch is at a teahouse on the way. The usual meal is dal bhat: lentil soup, rice and curried vegetables, with refills. By mid-afternoon you're at the night's lodge, where you clean the chain, eat and sleep.
Lodges
Lower down, lodges have private rooms and hot showers. Higher up, they are colder and simpler, with shared facilities and a stove in the dining room. Lodges give you blankets, but bring a warm sleeping bag for the high nights. You rarely need to book ahead, except at the last lodges before a high pass in peak season.
Money, water and power
Cash. Bring enough Nepali rupees from Pokhara or Kathmandu for the whole route. Cash machines on the trail are few and often don't work.
Prices rise with height. Food and extras cost more the higher you go.
Water. Lodges provide water. Treat it, and treat anything you take from a stream. Carry a filter and tablets, because a filter can freeze and crack on a cold night.
Charging. Most villages have electricity. Higher up, charging and hot showers usually cost a little extra. A small power bank saves you waiting for a socket.
Signal. A local SIM works in towns and main valleys. Expect none near the high passes.
Getting your bike and bags around
Jeeps and buses run to the main trailheads, and bikes travel on the roof. Take your bags off first and pad the frame where it's tied down. Mountain flights use small aircraft with a very small checked baggage allowance, so plan for your bike to travel by road.
Carry your kit, or let us carry it
There are two ways to ride Nepal's long routes with us.
Carry your own kit. Hire a bike from us or bring your own, and ride lodge to lodge at your own pace. Part 11 explains how we help.
Ride supported. On our guided mountain bike tours, a support vehicle or porters move your bags, and you ride with a day pack.
If you're not sure which suits you, read about guided or self-guided mountain biking in Nepal.
Bikepacking routes in Nepal: where and when
Start around Pokhara or the Kathmandu Valley for a first overnight. Go to Lower Mustang for a few days at height. The Annapurna Circuit is the big one. Upper Mustang needs a licensed guide.
Region | Height | What you ride | Good first trip? | Guide | Best months |
Pokhara hills | About 800 to 1,800 m (2,600 to 5,900 ft) | Village trails and ridge tracks, with lodges on the hilltops | Yes, for one or two nights | Not needed | October to May |
Kathmandu Valley rim | About 1,400 to 2,200 m (4,600 to 7,200 ft) | Forest singletrack and old temple towns | Yes, for one or two nights | Not needed | October to May |
From about 2,700 m (8,900 ft) | Dry valleys, long descents and strong wind | After some riding at height | Not required | October to November, March to May | |
Up to 5,416 m (17,769 ft) | Jeep track, old trail, high singletrack and a pass you push over | No. For fit, experienced riders. | A guide rule applies on paper | October to mid November, late March to May | |
Up to about 4,280 m (14,040 ft) | High desert tracks to the walled town of Lo Manthang | Only with a guide | Required by law | March to November, including the monsoon |
Permits
Permit | Where you need it | Fee | How to get it |
Annapurna Conservation Area permit | The Annapurna Circuit and Lower Mustang | NPR 3,000 for foreign visitors | Online from the conservation area's e-permit site, or in person at the Nepal Tourism Board offices in Kathmandu and Pokhara. It costs double at a trail checkpoint. |
TIMS card | Routes where the guide rule applies | NPR 2,000 for foreign visitors | Only through a registered agency. We can arrange it. |
Upper Mustang restricted area permit | North of Kagbeni | USD 50 per person per day | Only through a registered agency, with a licensed guide. We arrange it. |
Carry printed permits and register at each checkpoint. It also helps rescuers find you.
The guide rule
Since 2023, Nepal Tourism Board rules say foreign trekkers on listed routes, the Annapurna Circuit included, must travel with a licensed guide. The rule doesn't mention cyclists separately, and checkpoints have applied it differently from season to season. Plan as if it applies to you, and ask us what the checkpoints are asking for before you book flights. If you need one, we can add a licensed guide to your bike hire.
Day rides and overnights around Pokhara and the Kathmandu Valley need no guide. Upper Mustang always does.
When to go
October and November: dry trails and the clearest views. The best time for every route.
March to May: warm and dry. High passes open from late March.
December to February: ride low. Pokhara and the Kathmandu Valley are dry and quiet. High passes are closed by snow.
June to September: monsoon. Trails are muddy, and landslides are a risk. Upper Mustang stays dry.
Month-by-month detail is in our guide to the best time to mountain bike in Nepal. For route details, see our guides to the Annapurna Circuit, Lower Mustang and Upper Mustang.
What the Himalaya does to a loaded bike
Six things wear down a loaded bike and its rider here: dust, long descents, cold, thin air, wind, and walking. Set up for those and the rest is easy.
What you meet | What it does | What to do |
Dust | Grinds the chain, clogs bag zips, and gets into suspension seals | Use a dry or wax lube. Wipe and re-lube the chain every evening. Brush bag zips clean. |
Long descents | Wear brake pads fast. The drop from Thorong La to Muktinath is 1,616 m (5,302 ft) in one go. | Start on new pads and carry a spare set. Brake hard and briefly, not lightly all the way down. |
Cold nights | Freeze water, filters, and weak sealant. Drain phone and light batteries. | Keep your filter, phone, and power bank in your sleeping bag. Use fresh sealant. |
Thin air | Cuts your power above about 3,000 m (9,840 ft) | Fit easier gears than you use at home, and carry less. |
Wind | In the Kali Gandaki valley, a strong wind blows from the south from late morning | Ride that valley early. A wide handlebar roll catches the wind, so keep it small. |
Walking with the bike | Stone steps and steep trail mean pushing and carrying. The climb to Thorong La takes four to six hours on foot from the last lodge. | See below. |
Set up for pushing and carrying
Most bikepacking advice is written for riding. In the Himalaya, you also need to think about the hours you spend off the bike.
Leave room to shoulder the bike. A full frame bag fills the triangle, so you can't put your arm through it. A half-frame bag leaves that space open.
Keep bags high and tight. Low bags catch on stone steps.
Wear shoes you can walk in. Flat pedals with grippy shoes work well. If you clip in, use shoes with a walking sole and recessed cleats.
Keep the load light. You notice every kilogram far more when the bike is on your shoulder at 5,000 m (16,400 ft).
Altitude when you ride on your own
On a bike, you can gain height faster than your body can adjust. With no guide watching, the pacing is your job.
Plan by the height you sleep at, not the highest point you ride to.
Above 3,000 m (9,840 ft), raise your sleeping height by no more than about 500 m (1,640 ft) a night.
Take a rest day every three or four days.
A headache that doesn't clear with water and rest, nausea, or dizziness means stop climbing. If it gets worse, go down.
Buy travel insurance that names mountain biking, covers the highest point on your route, and includes helicopter rescue. Some policies only cover high altitude when you're with a licensed guide, so check that before you buy.
> Guide's tip: on the coldest mornings, carry your water inside your jacket. A frozen bottle on the frame is no use to you on the way up to a pass.
Bring your own bike or rent one in Nepal
Bring your own bike if you know it well and your trip is long. Rent one of ours if you'd rather travel light. Either way, bring your bags from home.
Bring your own bike | Rent from us | |
Fit and feel | Exactly what you know | We size the bike to you before you leave |
Your bags | Already fitted and tested | Tell us what bags you have, and we'll match a bike to them |
Travel | A bike box on every flight | You fly with your bags only |
Setup for Nepal | You change gears, tyres, and pads before you fly | Already done in our workshop |
Spares | You bring the parts made for your frame | We know the bikes and hold the parts |
If you rent from us
Our fleet is Trek and Scott, with hardtails and full-suspension bikes. Every bike is serviced in our own workshop in Pokhara before it goes out. You can see the bikes on our bike rental page. If you're deciding between a hardtail and a full-suspension bike for the high routes, read our guide to the best bike for the Annapurna Circuit.
If you bring your own
Have it checked in our workshop when you arrive, so anything that moved in the bike box is fixed before you ride. Tyres, sealant, chain lube, and common parts are in our shop.
Bring these from home, because you won't find them on the trail:
Your bikepacking bags
A spare derailleur hanger for your exact frame, ideally two
Brake pads for your exact brakes
Any part that only fits your bike
What we do for riders who carry their own kit
Set up and check the bike for your route
Tell you which trails are rideable this season and where new roads have replaced old trails
Arrange your permits and a licensed guide where you need one
Send you off with the key spares and show you how to fit them
Tell us your route and your dates, and we'll give you a straight answer on what you need.
Ready to plan your ride?
Tell us where you want to ride, when you're coming, and whether you're bringing a bike. We'll tell you what you need and what you can leave at home.
Frequently asked questions
Can you go bikepacking on a mountain bike?
Yes. A mountain bike is one of the best bikes for it, because it already has wide tyres, low gears, suspension, and strong brakes. Add soft bags, put the weight low and in the middle, and adjust the suspension and tyres for the load.
Is a hardtail or a full-suspension bike better for bikepacking?
A hardtail is easier to load, lighter and simpler, so it suits most trips. A full-suspension bike is better on rough, technical trails, but it has less room for bags. It works best when your load is light.
Can you bikepack on a full-suspension mountain bike?
Yes. Use a small or half-frame bag that fits around the shock, and a dropper-friendly seat pack or a small axle-mounted rack. Check that nothing touches the rear tyre when the suspension is fully compressed.
Can I use a dropper post with a seat pack?
Yes, with a dropper-friendly pack. These are usually under 10 litres and hang from the saddle rails. You need about 13 cm (5 inches) between the saddle rails and the rear tyre with the post down.
How much weight should I carry when bikepacking?
As little as you can. A good target is 5 to 8 kg (11 to 18 lb) of kit for a lodge trip, and 8 to 12 kg (18 to 26 lb) for a camping trip before food and water.
Do I need a rack for mountain bike bikepacking?
No. Soft bags strap straight to the bike. A small rack that mounts to the rear axle is a useful option if you have a dropper post, a full-suspension bike, or very little space behind the saddle.
Should I wear a backpack?
Only a small one. Keep the weight on the bike and use a light pack for water and valuables.
What tyres are best for bikepacking on a mountain bike?
Tubeless tyres at least 2.0 inches wide suit most routes. For rough or loose ground, use 2.3 inches or wider with a tough casing. Run a few psi more than usual to allow for the load.
What is the difference between bikepacking and bike touring?
Mostly how you carry your kit and where you ride. Touring uses racks and panniers and suits roads. Bikepacking uses soft bags on the bike and suits trails, jeep tracks, and rough dirt roads.
Can you go bikepacking in Nepal?
Yes. Nepal's main mountain routes have family-run lodges along them, so you ride from lodge to lodge with a small load. Day rides and overnights around Pokhara and the Kathmandu Valley need no guide. Upper Mustang requires one by law.
Do I need a tent for bikepacking in Nepal?
Not on the main routes. Lodges give you a bed, blankets, and hot meals. Bring a warm sleeping bag for the high nights.
Do I need a guide to bikepack in Nepal?
It depends on where you ride. You don't need one around Pokhara or the Kathmandu Valley. A guide is required by law in Upper Mustang. On the Annapurna Circuit, a guide rule has applied to trekkers since 2023, so plan as if it applies to you and ask us before you book.
Can I rent a mountain bike for bikepacking in Nepal?
Yes. We rent Trek and Scott hardtails and full-suspension bikes from Pokhara, serviced and set up in our own workshop. Bring your own bags.
When is the best time for bikepacking in Nepal?
October and November, then March to May. In winter, stay around Pokhara and the Kathmandu Valley. In the monsoon, only Upper Mustang stays dry.
Can I bikepack the Annapurna Circuit?
Yes, if you're fit and experienced. Most of it is rideable, but you push and carry the bike over Thorong La at 5,416 m (17,769 ft). Allow about two weeks, keep your load light, and take the altitude seriously.